Amazon EKS design, use of spot instances and cluster scaling
Implementation and configuration details of cluster autoscaler and descheduler for EKS running both on-demand and spot instances.
Overview and Background
The work I conduced around Amazon Elastic Kubernetes Service (Amazon EKS) required a lot of small add-ons and components to make it work as expected. The crucial one is cluster-autoscaler which will be covered in detail later on. In general, EKS is a managed control-plane that makes it easier to deploy, manage, and scale containerised applications using Kubernetes on AWS.
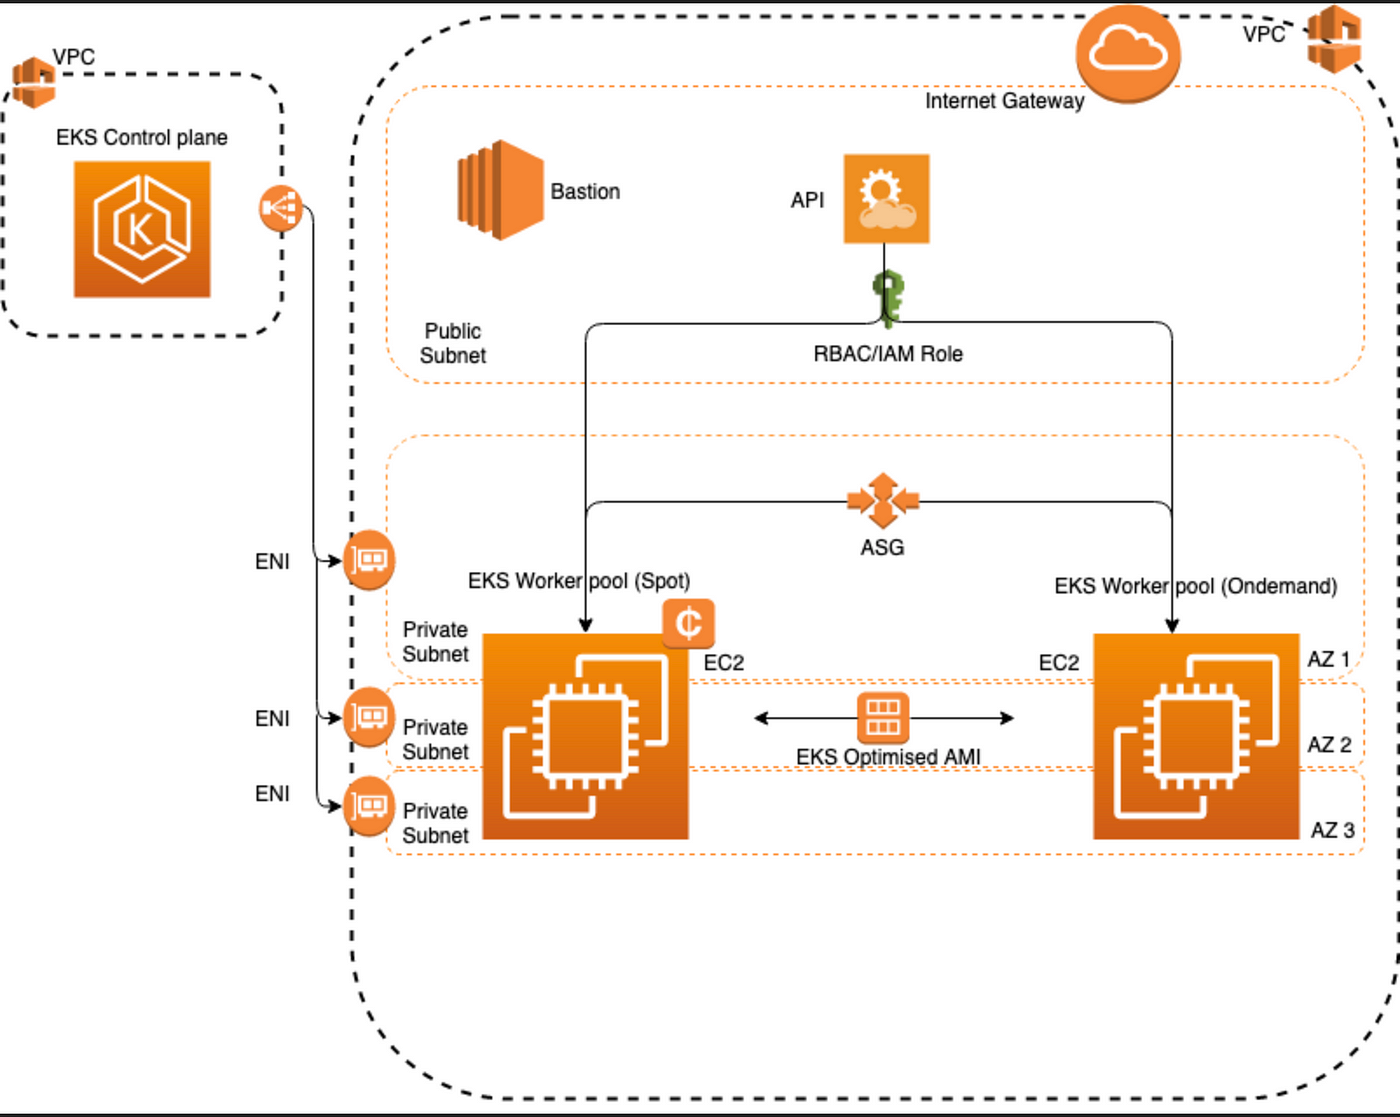
As part of my work I have fully templated the deployment of the infrastructure that includes custom VPC configuration, EKS control plane, worker nodes and bastion host. All templates are written using Terraform and Cloudformation. I selected to use both solutions because I don’t want to limit myself to a single technology that could be missing features which are available in the other one; instead I am taking advantage of all the latest features that are available to date.
For cost reduction purposes I am utilising both on-demand and spot EC2 instances to run worker nodes. Amazon spot instances are the unused EC2 capacity in the AWS cloud that are available to use for lower price. Spot Instances are available at up to a 90% discount compared to on-demand prices.
Infrastructure configuration
At the time of writing this post I am using Terraform version 0.12.9 and EKS 1.14.
VPC configuration uses private subnets setup for worker nodes. I am using community module which is well supported and easy to use. Here is the fully functional VPC configuration with ECR endpoint enabled:
module "vpc" {
  source  = "terraform-aws-modules/vpc/aws"
  version = "2.9.0"
  name = "${var.cluster_name}-${var.environment}-vpc"
  azs = var.availability_zones

  cidr            = var.vpc_cidr
  private_subnets = var.private_subnets_cidrs
  public_subnets  = var.public_subnets_cidrs     enable_dns_hostnames = true
  enable_dns_support   = true
  enable_nat_gateway = true
  enable_vpn_gateway = true

  single_nat_gateway = var.vpc_single_nat_gateway
  one_nat_gateway_per_az = var.vpc_one_nat_gateway_per_az

  private_subnet_tags = {
    "kubernetes.io/role/internal-elb" = "1"
  }
  public_subnet_tags = {
    "kubernetes.io/role/elb" = "1"
  }
  tags = merge(var.tags,{
    "kubernetes.io/cluster/${var.cluster_name}-${var.environment}" =   "shared"})

  # VPC Endpoint for ECR API
  enable_ecr_api_endpoint = true
  ecr_api_endpoint_private_dns_enabled = true
  ecr_api_endpoint_security_group_ids =[data.aws_security_group.default.id]

  # VPC Endpoint for ECR DKR
  enable_ecr_dkr_endpoint = true
  ecr_dkr_endpoint_private_dns_enabled = true
  ecr_dkr_endpoint_security_group_ids = [data.aws_security_group.default.id]}
As you can see in the config above, all subnets are tagged appropriately in order to allow correct discovery options from inside the Kuberentes cluster. E.g. tag named kubernetes.io/role/internal-elb is required to indicate in which subnet internal load balancer should be placed.
EKS Cluster configuration is relatively simple once the VPC is in place. It is a single terraform resource that defines it. I enabled all the logging options for the control-plane for auditing/debugging purposes.
resource "aws_eks_cluster" "cluster" {
  enabled_cluster_log_types = ["api", "audit", "authenticator", "controllerManager", "scheduler"]
  name = "${var.cluster_name}-${var.environment}"
  role_arn = aws_iam_role.cluster.arn
  version = var.eks_version  vpc_config {
    subnet_ids = flatten([module.vpc.public_subnets,module.vpc.private_subnets])
    security_group_ids = [aws_security_group.cluster.id]
    endpoint_private_access = "true"
    endpoint_public_access = "true"
  }
}
I omitted details related to security groups and IAM roles. Full set of templates can be found on github.
Worker nodes configuration is much more interesting setup which requires use of resources such as Auto Scaling Group (ASG), Launch Templates, spot/on-demand EC2 instances. Additionally to fully make spot instances work I needed to configure/implement Cluster-Autoscaler (CA) and Spot interrupt handler, they will be covered after our infrastructure is in place.
I am setting up a Mixed ASG with Spot Instances using Cloudformation. The reason for that is property called AWS::AutoScaling::AutoScalingGroup which allows me to use the following:
UpdatePolicy:
  AutoScalingRollingUpdate:
    MinInstancesInService: !Ref NodeAutoScalingGroupDesiredCapacity
    MaxBatchSize: '1'
    PauseTime: 'PT2M'
As it turns out, this is not part of AWS API and so is not available in Terraform. It is a very important feature which allows you to perform rolling updates of the worker nodes.
To make my setup consistent with the rest of the code, I am using Terraform to deploy Cloudformation template/stack for workers.
resource "aws_cloudformation_stack" "spot_worker" {
  name = "${var.cluster_name}-${var.environment}-spot-worker-nodes-stack"
  capabilities = ["CAPABILITY_IAM"]
  parameters = {
    KeyName = var.ssh_key_name
    NodeImageId = var.ami_id
    ClusterName = aws_eks_cluster.cluster.id
    NodeGroupName = "${var.cluster_name}-${var.environment}-spot-node-group"     ASGAutoAssignPublicIp = "no"
    NodeInstanceType = var.spot_worker_instance_type     Subnets = join(",", module.vpc.private_subnets)
    VpcId = module.vpc.vpc_id
    NodeInstanceProfileArn = aws_iam_instance_profile.worker_node.arn
    ClusterControlPlaneSecurityGroup = aws_security_group.cluster.id
    ExistingNodeSecurityGroups = "${aws_security_group.node.id},${module.vpc.default_security_group_id}"
    InstanceTypesOverride = "m5.4xlarge,m5d.4xlarge,m5a.4xlarge,m5ad.4xlarge"
    OnDemandBaseCapacity = var.ondemand_number_of_nodes
    OnDemandPercentageAboveBaseCapacity = var.ondemand_percentage_above_base
    SpotInstancePools = var.spot_instance_pools
    NodeAutoScalingGroupDesiredCapacity = var.desired_number_worker_nodes
    NodeAutoScalingGroupMinSize = var.min_number_worker_nodes
    NodeAutoScalingGroupMaxSize = var.max_number_worker_nodes

    BootstrapArgumentsForOnDemand = "--use-max-pods 'true' --kubelet-extra-args '--node-labels=lifecycle=OnDemand --system-reserved cpu=250m,memory=0.2Gi,ephemeral-storage=1Gi --kube-reserved cpu=250m,memory=1Gi,ephemeral-storage=1Gi --eviction-hard memory.available<0.2Gi,nodefs.available<10% --event-qps 0'"

    BootstrapArgumentsForSpot = "--use-max-pods 'true' --kubelet-extra-args '--node-labels=lifecycle=Ec2Spot --register-with-taints=spotInstance=true:PreferNoSchedule --system-reserved cpu=250m,memory=0.2Gi,ephemeral-storage=1Gi --kube-reserved cpu=250m,memory=1Gi,ephemeral-storage=1Gi --eviction-hard memory.available<0.2Gi,nodefs.available<10% --event-qps 0'"  }

    template_body = file("cfm/worker-node-spot-stack.yaml")
    tags = var.tags
    timeouts {
      create = "60m"
      update = "2h"
      delete = "2h"
    }
}
There is a fair amount of parameters that are being passed into the stack template. I am not going to include the Cloudformation template but you can find it on github.
Important part of the terraform resource is InstanceTypesOverride = “m5.4xlarge,m5d.4xlarge,m5a.4xlarge,m5ad.4xlarge”. The default instance type for the worker nodes is m5.4xlarge. However, as I am utilising spot instances so I need to be able to use more than one instance type. The reason is that spot instances can become unavailable in specific Availability zones. All four instance types are part of the same family with very similar specs. Having instance types with the same specs i.e. the same number of CPUs and same RAM is crucial to make CA working correctly.
Another two parameters that I want to point out are BootstrapArgumentsForOnDemand and BootstrapArgumentsForSpot. The arguments passed through those parameters are used by EKS Bootstrap.sh script which is packaged into the EKS optimised AMI. The bootstrap script supports setting any kubelet-extra-args at runtime. I configured node-labels so that Kubernetes knows what type of nodes have been provisioned. I also set the lifecycle for the nodes as OnDemand or Ec2Spot.
If you like to further investigate my configuration, please checkout my github repo with fully templated configuration.
Cluster Autoscaler configuration
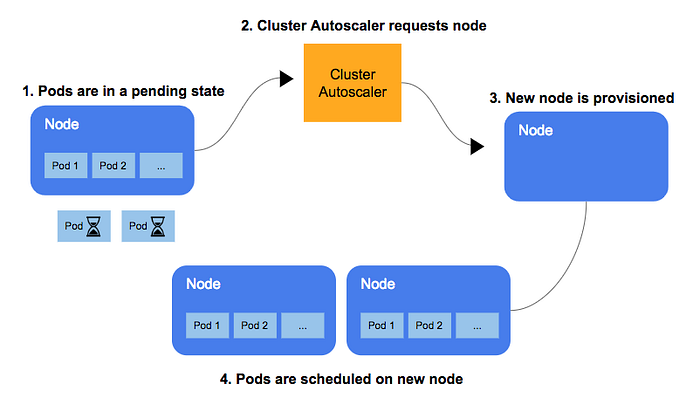
Cluster-autoscaler is an add-on that is not shipped with core Kubernetes code. It is configured as a deployment which you deploy and point it at specific ASGs. It monitors for pods which have pending status due to lack of available resources that is CPU and Memory in the cluster. When it detects such pods, CA will send an API call to EC2 ASG to increase the desired capacity of the group by the number of instances it calculates that are required to fit the pending pods on.
As mentioned in the previous section, CA has some problems when it comes to spot instances and ASGs with multiple instance types. Officially, CA only supports homogeneous node groups, it means that it needs to be pointed at ASGs that only run the same instance type. Here at fault for CA’s lack of support for heterogeneous node groups is its decision making algorithm. It assumes that all nodes in the group have the same hardware specs (CPU and Memory). So after it sees the specs of the first node in the node group that was introduced to the cluster from the ASG, it assumes that other nodes have the same specs. At this point I resolved this issue by using instance types that are similar in size. This allows me to use Spot instance and diversify instance types in order to achieve and maintain desired scale, and at the same time I won’t impact the way CA works with ASG.
CA deployment configuration:
---
apiVersion: apps/v1
kind: Deployment
metadata:
  name: cluster-autoscaler
  namespace: kube-system
  labels:
    app: cluster-autoscaler
spec:
  replicas: 1
  selector:
    matchLabels:
      app: cluster-autoscaler
  template:
    metadata:
      labels:
        app: cluster-autoscaler
    spec:
      serviceAccountName: cluster-autoscaler
      priorityClassName: high-priority
      containers:
        - image: gcr.io/google-containers/cluster-autoscaler:v1.14.5
          name: cluster-autoscaler
          resources:
            limits:
              cpu: 100m
              memory: 300Mi
            requests:
              cpu: 100m
              memory: 300Mi
          command:
            - ./cluster-autoscaler
            - --v=4
            - --stderrthreshold=info
            - --cloud-provider=aws
            - --skip-nodes-with-local-storage=false
            - --skip-nodes-with-system-pods=true
            - --expander=random
            - --node-group-auto-discovery=asg:tag=k8s.io/cluster-autoscaler/enabled,k8s.io/cluster-autoscaler/ceng-eks-test
          env:
            - name: AWS_REGION
              value: eu-west-1
          volumeMounts:
            - name: ssl-certs
              mountPath: /etc/ssl/certs/ca-certificates.crt
              readOnly: true
          imagePullPolicy: "Always"
      volumes:
        - name: ssl-certs
          hostPath:
            path: "/etc/ssl/certs/ca-bundle.crt"
      affinity:
        nodeAffinity:
          requiredDuringSchedulingIgnoredDuringExecution:
            nodeSelectorTerms:
            - matchExpressions:
              - key: beta.kubernetes.io/instance-type
                operator: In
                values:
                - m5.4xlarge
                - m5d.4xlarge
                - m5a.4xlarge
                - m5ad.4xlarge
In my configuration I am using Auto-Discovery option. This is indicate by — node-group-auto-discovery=asg:tag=k8s.io/cluster-autoscaler/enabled,k8s.io/cluster-autoscaler/ceng-eks-test. The usage of two tags is recommended. Based on official documentation, you should use a second tag like k8s.io/cluster-autoscaler/<YOUR CLUSTER NAME> when k8s.io/cluster-autoscaler/enabled is used across many clusters to prevent ASGs from different clusters recognised as the node groups.
In my case Cluster Autoscaler is used with mixed instances policy, to enable diversification across on-demand and spot instances, of multiple instance types in a single ASG. When using spot instances, this increases the likelihood of successfully launching a spot instance to add the desired capacity to the cluster versus a single instance type, which may be in short supply.
Additionally, there are factors which affect scaling, such as node labels and instance-type. Node affinity and anti-affinity are not affected in the same way, since these selectors natively accept multiple values; one must add all the configured instances types to the list of values. This is the last block of configuration in the above script.
Lastly, I am defining — expander flag which supports three options: random, most-pods, least-waster. Random will expand a random ASG on scale up. Most-pods will scale up the ASG that will schedule the most amount of pods. Least-waste will expand the ASG that will waste the least amount of CPU/Mem resources. In my config I tested random and least-waste setups, in both case everything was working as expected and I didn’t encounter any issues.
Full set of yaml templates for CA can be found in github.
Descheduler
Additionally to Cluster-Autoscaler, I am running descheduler. This is because of the limited scope CA provides.
Scheduling in Kubernetes is the process of binding pending pods to nodes, and is performed by a component of Kubernetes called kube-scheduler. The scheduler’s decisions, whether or where a pod can or can not be scheduled, are guided by its configurable policy which comprises of set of rules, called predicates and priorities. The scheduler’s decisions are influenced by its view of a Kubernetes cluster at that point of time when a new pod appears first time for scheduling.
As Kubernetes clusters are very dynamic and their state change over time, there may be desired to move already running pods to some other nodes for various reasons. For examples, nodes are under or over utilised, Some nodes failed and their pods moved to other nodes.
Consequently, there might be several pods scheduled on less desired nodes in a cluster. Descheduler, based on its policy, finds pods that can be moved and evicts them.
Here, I am using the default configuration and templates which can be found in the official repository.
The Spot Instances Interrupt Handler
If the available on-demand capacity of a particular instance type is depleted, the Spot Instance is sent an interruption notice two minutes ahead to gracefully wrap up things. In this case we need something to detect such signal from inside the cluster and start draining the node.
---
apiVersion: apps/v1beta2
kind: DaemonSet
metadata:
  name: spot-interrupt-handler
  namespace: kube-system
spec:
  selector:
    matchLabels:
      app: spot-interrupt-handler
  template:
    metadata:
      labels:
        app: spot-interrupt-handler
    spec:
      serviceAccountName: spot-interrupt-handler
      containers:
      - name: spot-interrupt-handler
        image: marcincuber/k8s-spot-handler:1.14.6
        imagePullPolicy: Always
        env:
        - name: POD_NAME
          valueFrom:
            fieldRef:
              fieldPath: metadata.name
        - name: NAMESPACE
          valueFrom:
            fieldRef:
              fieldPath: metadata.namespace
        - name: SPOT_POD_IP
          valueFrom:
            fieldRef:
              fieldPath: status.podIP
      nodeSelector:
        lifecycle: Ec2Spot
A Kubernetes DaemonSet defined above will run one pod per node which will periodically poll the EC2 Spot Instance Termination Notices endpoint. Once a termination notice is received, it will try to gracefully stop all the pods running on the Kubernetes node, up to 2 minutes before the EC2 Spot Instance backing the node is terminated. Please note that in the config we specify nodeSelector property which allows us to spin pods only on spot instances.
Full configuration can be found in github.
Conclusions
I demonstrated full configuration of EKS cluster which allows for deployment of VPC, control-plane, worker nodes. Additionally, I covered Cluster Autoscalar, Spot interrupter and Descheduler configurations.
Lastly, when running any deployment or daemonset ensure not to use AWS credentials directly. Always remember to provision or pass temporary credentials to your pods. Kube2iam is one of the solutions that can help with that. For further information please read https://medium.com/@marcincuber/amazon-eks-iam-roles-and-kube2iam-4ae5906318be
In collaboration with NewRelic a technical blog on EKS and my work can be found -> https://blog.newrelic.com/product-news/news-uk-content-capabilities-amazon-eks-new-relic/